Breaking News :

Latest Post

Showing posts with label windows 7. Show all posts

Codec Pack 4.0.5.826 For Windows 7

Written By Unknown on Monday, 27 August 2012 | 20:33


Guys ,The Windows 7 Codec Pack has been created to make installing major codec’s , filters , plug-ins and splitters a breeze . It’s a simple to install package of audio and video codecs / filters / splitters used for playing back music and movie files . The Windows 7 Codec Pack supports almost every compression and file type used by modern video and audio files . Also included in the package are a number of encoder codec’s , allowing you to encode files in formats such as DivX . XviD , x264 and many more in your favourite encoding application . The package allows playback of almost every file type in existence , the only exceptions being commercial formats that require a special player . By using SlySoft AnyDVD HD with this Codec Pack users can play : Protected Bluray , HD-DVD , AVCHD , DVD , CD discs .


The package is easy to install , while also offering advanced settings to the high end user :

For simple installation select “Easy Installation” .

For advanced installation options select “Expert Installation” .


Special care has been taken to make the package :

Play a huge variety of Audio/Video files .

Free of conflicts .

Cause minimal impact on system performance ( Disk space used , registry entries and stability ) .

Compatible in full with Microsoft Windows 7 .


Compression types include :

Hi10p/10bit x264 | x264| h .264 | AVC | DivX | XviD | MP4 | MPEG4 | MPEG2 and many more .

File types include : .mkv | .bdmv | .evo | .avi | .flv | .mp4 | .ts | .webm | .m4v | .m4a | .ogm | .ac3 | .dts | .flac | .ape | .aac | .ogg | .ofr | .mpc | .3gp and many more .


Resolutions supported include :

All resolutions upto , and including SD ( Standard Definition ) 480i , 480p , 576i , 576p , + HD ( High Definition ) 720i , 720p , 1080i , 1080p and beyond .


Package Components :

ffdshow DirectShow Video Codec 20120205 x86 Revision 4305 by clsid .

ffdshow DirectShow Video Codec 20120205 x64 Revision 4305 by clsid .

LAV Video decoder 0 .45 x86 & x64 .

XviD Video ( Encoder ) Codec v1 .3 .2 .

Lagarith Video ( Encoder ) Codec v1 .3 .27 x86 & x64 .

Flash Video Splitter/Decoder v1 .5 .2 .3456 x86 & x64 .

AC3Filter v1 .63b AC3/DTS Decoder x86 & x64 .

LAV Audio Decoder 0 .45 x86 & x64 .

DivX Audio Decoder 4 .1

Lame MP3 v3 .98 .2 ACM Encoder/Decoder Codec .

DSP-worx Bass Source Filter/Decoder v1 .30 .

Haali Media Splitter/Decoder 16/09/11 x86 & x64 – For MP4 , MKV , OGM and AVI files .

LAV Splitter 0 .45 x86 & x64 .

VSFilter v2 .39 .5 x86 & v2 .37 x64 – Subtitle Readers .

CDXA Reader v1 .5 .2 .3456 – Also known as Form 2 Mode 2 CD or XCD x86 & x64 .

GSpot Codec Information Appliance v2 .70a .


You may Download it from Here.

Windows 7 eBook

Written By Unknown on Sunday, 25 September 2011 | 08:35


Download Free Windows 7 eBook

 It’s the best *free* ebook out there that you will find. If you want to know what it’s all about read the description below.


eBook Contents


Page 1: Index
Page 2: Disclaimer

Disable/Enable Section

Page 3: Disable Windows 7 Hibernation

Page 4: Disable Windows 7 Indexing

Page 8: Enable DreamScene in Windows 7!

Page 9: Enable Hidden Administrator Account

Page 16: Enable/Disable hidden files in Windows 7


Media Player Section

Page 5: Windows Media Player Security Component Upgrade Fix (DRM)


Hardware Section

Page 6-7: Two Windows 7 CPU Temperature Monitoring Solutions


Speed Up Section

Page 10: Speed Up Windows 7 Boot

Page 11-12: Speed up Windows 7 Taskbar Thumbnail Preview


Page 13: Speed Up Windows 7 Shutdown Time

Page 15: Speed Up Application Access – Increase your productivity


eBook can be download here:


Windows 8 Shell Themes (for Windows 7)


This theme modifies the progress bar, the start panel, the explorer shell, the start orb, the login screen and much more.


The following file is a torrent file which you can open with torrent clients like uTorrent. The archive includes several Windows 8 themes:


7 Skin Pack 6.0 For XP

Written By Unknown on Saturday, 20 August 2011 | 02:11

Transform XP to 7
Support:
- Windows XP (Home, Pro, RTM, SP1, SP2, SP3, Corporate)
- Windows 2003 (Standard, Enterprise, Datacenter, Web, RTM, SP1, SP2)
- Windows Media Center Edition (2003, 2004, 2005)
- Windows XP Tablet PC Edition
- All Language Versions
Note : Before install close all runnig program , after finish restart your system .
Skin Packs installer have easy and safe install option , its better to unistall old or other version of skin packs.

Programs:
Note : Some Program Need to install .Net FrameWork 4.0 For Runnig


Missing operating system: Windows 7

Written By Unknown on Tuesday, 19 July 2011 | 11:05

Run chkdsk to repair disk errors

First of all, don’t panic! If you panic and do things without thinking about consequences, you might damage your system and lose data. The solution to this problem is usually very simple. Your hard drive might have disk errors, therefore you are not able to start your system. This often happens when you restart your PC during a boot-up secquence while it’s loading safe-mode for example.

1. Find your Windows 7 DVD.
2. Start your PC, insert your Windows 7 DVD and hit a key when you are asked to (to boot from DVD). It is possible that you have to change the boot order in your BIOS to boot from DVD.
3. Follow the instructions on the screen, but don’t install Windows 7, instead click on “Repair your computer“:


he installer will now search for Windows installations on your PC and list them all. Select your Windows 7 installation and click on next.


4. Open the command prompt.


Attention: Do NOT click on “System Restore” or “System Image Recovery”. If you try to restore/recover your system that way, you might damage your Windows 7 installation irreversibly.

5.You will probably be in a folder X:\sources\ . Don’t worry, if your partitions are still there you can run a chkdsk on them.


Run a chkdsk for your main partition (e.g. C:), to do that enter:
chkdsk c: /f/r

/f /r will both fix errors and recover lost data.

/f will only fix errors on your disk

/r will only recover lost data
This will, in most cases, repair your disk errors and you will be able to start Windows 7 again.

Windows 7 Bootrec.exe – Repair MBR

While you’re at it, you also might want to repair and fix your MBR (Master Boot Record), add a new boot sector and scan your disk for Windows 7 installations.

/fixmbr

This will create a new Master Boot Record, but will not overwrite your exisiting partition table.

/fixboot

This will add a new boot sector. If you boot sector is damaged you might not be able to start your system.

/rebuildbcd

Scans your disk for Windows-7 compatible installations, needed to repair your Windows 7 installation.

How to replace Explorer.exe in Windows 7?

Do you want to replace the Explorer.exe? Some Windows 7 themes that you can download on this site will come with a file “explorer.exe”. This is a very important system file, so please be careful, make a backup and follow the instructions closely when you learn how to replace the explorer.exe.


The easiest and shortest way to replace the explorer.exe and any other system files is to download a registry hack that will add the option Take Ownership to your right-click context menu.
Download this script:>>Download<<


and double-click on the .reg (registry) file to add an option “Take Ownership” to your contextual menu (the right-click menu).
You can then right-click on your system files and take ownership of them. After that, you can rename all files and replace the system file / explorer.exe easily.

There are three methods, one for the beginners and the other for advanced users, click on the links below to start:
  • Method 1 (Beginner via Registry)
  • Method 2 (Beginner via GUI)
  • Method 3 (Advanced via Command Prompt)


Method 1: Change registry path to explorer.exe

The easiest method to replace explorer.exe is to open the registry and then change the path to the explorer.exe.

If you still need the system icons: Volume, Network Connections, Battery and Action Center, then don’t use Method1 because changing the registry path to explorer2.exe will disable them.

0. Make sure to know the difference between a 64-bit explorer.exe and a 32-bit explorer.exe. You can’t use a 64-bit explorer.exe on a 32-bit system.

1. Rename your new explorer.exe to explorer2.exe and copy it into the Windows directory: C:\Windows\
2. Open the registry: Click on “Start” and enter regedit into the search field:
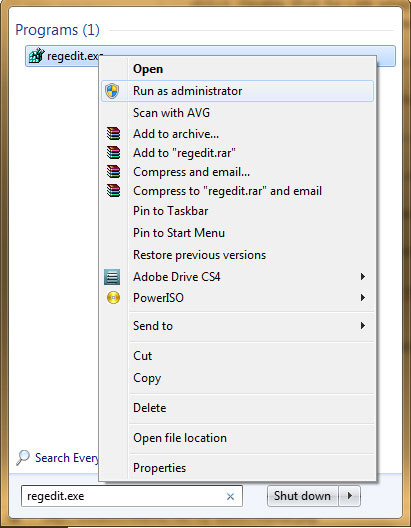

                                                                                                   
3. Right-click on regedit at the top and select “Run as administrator”
4. Uncollapse the following path: HKEY_LOCAL_MACHINE>Software>Microsoft>Windows NT>CurrentVersion>Winlogon
5. Change explorer.exe to explorer2.exe.
6. End the process explorer.exe via the task manager and start a new process by entering “explorer2.exe”.
If 6. is too complicated for you: Reboot or read below for more instructions how to end the process explorer.exe.

Method 2: Take Ownership + Edit Permissions via Interface

Assign Ownership of Explorer.exe

1. Right-click on explorer.exe and click on “Properties“. Go to the tab “Security“, click on “Advanced“:


2. Go to the tab “Owner” and click on “Edit“:


3. Assign the ownership to your administrator account by selecting your “Administrator account” (usually  Administrators(username\Administrators)) and click on “Apply


The current owner should now be your administrator account. Confirm that!

Change Permissions of Explorer.exe

4. Click on “OK” and you will be back at the security tab of explorer.exe. There click on “Edit”:


5. Select your administrator account (usually Administrators(username\Administrators ) and check the option “Full Control“. Click on “Apply“:


6. Now you can rename your explorer.exe to explorer.exe_old and copy your new explorer.exe into the Windows folder.
Restart your PC or restart explorer.exe (instructions below).

Method 3: Take Ownership via Command Prompt

Copy your new explorer.exe to C:\

Take Ownership of new Explorer.exe

Next, we take control of it!
You can either download this script: (it will add the option “take ownership to your context menu) or you can do it manually.
I usually do it manually:
Enter cmd.exe into the search field on the Start menu and right-click on cmd.exe, click on “Run as administrator”.
  • Enter cd C:\Windows\
  • Enter TAKEOWN /F explorer.exe

Terminate Explorer.exe

Open up the task manager (CTRL+ALT+DEL) and right-click on Explorer.exe and terminate it:


New Task (Run…)

Don’t be shocked, your taskbar will disappear. You can always make it reappear again by launching a new task and entering “explorer.exe”.


Now click on “New Task” and enter:
  • runas /u:Administrator cmd.exe (this will launch cmd.exe as administrator)
You will be prompted for your password, enter it

Take Ownership of old Explorer.exe

5. Take ownership of the real explorer.exe and grant permission to administrators to modify it :
  • cd C:\Windows\
  • TAKEOWN /F explorer.exe
  • ICACLS explorer.exe /grant administrators:F

Final Step: Rename and move Explorer.exe

Rename the explorer.exe and paste the new explorer.exe into the Windows folder:
  • Enter rename explorer.exe explorer.exe_old
  • Enter move C:\explorer.exe C:\windows\
Back in the taskmanager click on “New Task” and enter “explorer.exe”. Voilà, you just replaced your explorer.exe!

Explorer.exe: Class not registered

If you receive the error “Class not registered”, you might want to try this:


Start > Run > regsvr32 ExplorerFrame.dll

Make sure that ExplorerFrame.dll is a valid DLL


If you receive the error “The module ExplorerFrame.dll was loaded but the entry-point DllRegisterServer was not found. Make sure that ExplorerFrame.dll is a valid DLL or OCX file and then try again”, you are probably trying to launch a 32-bit explorer.exe on a 64-bit system.
Are you running a 64-bit system? Then make sure that your new explorer.exe is a 64-bit file or it won’t work!


“Bootmgr is missing” in Windows 7

The dreaded message “bootmgr is missing” still exists today, but luckily there are some easy solutions.


First of all, don’t panic. If your bootmgr file is missing that doesn’t necessarily mean that you lost any data, it simply means that your boot manager is missing, nothing more.
To repair your boot records, you have to launch the start-up option “repair your computer”. On boot-up press F8 to get to startup options. Click on “Repair your computer”:


You’ll get a list of operating systems installed on your PC:


Method 1: Repair bootmgr via Command Prompt

Open the command prompt.


Next, simply enter the following command to fix your boot record:
/fixboot
In case your master boot record has been damaged as well, I would also run
/fixmbr


Method 2: Repair bootmgr via “Startup Repair”

Theoretically, Windows 7 should be able to find and fix this error. If you click on “Startup Repair” instead of Command Prompt, then Windows will scan your system for common errors and will hopefully figure out that your bootmgr is broken.


Check disk for errors

Another error why you are receiving the “bootmgr is missing” error after installing Windows 7, might be that your hard drive has disk errors. It is always a good idea to also run the command
chkdsk C:\ /f /r
This might take some time, depending on the size of your hard drive, but it is necessary to verify that there are no corrupted files on your disk.

Web Browsers

Mobiles

Hacking Tricks and Tips

 
Support : Creating Website | Aman Kamboj | Dewnext
Template Modify by Creating Website