Breaking News :

MCSE TRAINING KIT

Written By Unknown on Sunday 25 September 2011 | 09:18


The following file is a torrent file which you can open with torrent clients like uTorrent


C++ Video Tutorials from Virtual Training


C++ Video Tutorials from Virtual Training
Author: L. Lee | ISBN: 1930519079 | Duration: 5 hrs / 43 lessons | Video Format: .mov (QuickTime Movie)
Compatibility: Win Vista, XP, 2000, Mac OS X, Linux

C Plus Plus (C++) is a programming language that is both procedure-oriented and object-oriented. In VTC?s tutorial, Professor Arthur Lee will explain the environment of C++, then guide you into writing equations, creating functions and output, looping, and much more.

• Quick and easy way to learn C++ through a series of movies.
• No expensive classroom training courses
• No boring hard to follow books to read
• Learn from your own desk at a pace that suits you
• High quality affordable training that is easy to use and follow
• Use our unique training method, it makes learning easy no matter what your learning style


The following file is a torrent file which you can open with torrent clients like uTorrent


Windows 7 eBook


Download Free Windows 7 eBook

 It’s the best *free* ebook out there that you will find. If you want to know what it’s all about read the description below.


eBook Contents


Page 1: Index
Page 2: Disclaimer

Disable/Enable Section

Page 3: Disable Windows 7 Hibernation

Page 4: Disable Windows 7 Indexing

Page 8: Enable DreamScene in Windows 7!

Page 9: Enable Hidden Administrator Account

Page 16: Enable/Disable hidden files in Windows 7


Media Player Section

Page 5: Windows Media Player Security Component Upgrade Fix (DRM)


Hardware Section

Page 6-7: Two Windows 7 CPU Temperature Monitoring Solutions


Speed Up Section

Page 10: Speed Up Windows 7 Boot

Page 11-12: Speed up Windows 7 Taskbar Thumbnail Preview


Page 13: Speed Up Windows 7 Shutdown Time

Page 15: Speed Up Application Access – Increase your productivity


eBook can be download here:


Windows 8 Shell Themes (for Windows 7)


This theme modifies the progress bar, the start panel, the explorer shell, the start orb, the login screen and much more.


The following file is a torrent file which you can open with torrent clients like uTorrent. The archive includes several Windows 8 themes:


Skin Pack Installer System

Written By Unknown on Saturday 20 August 2011 | 03:34

  Now no need to create long and complicated scripts, no need to spend many hours in creating customization packs or transformation packs or skin packs for Windows Vista and 7.

Our friend "hameddanger" @ DA has done tremendous job in creating a free and easy to use installer system which helps you in creating skins packs quickly and easily.

"Skin Pack Installer System" allows you to replace existing images, icons, media files, etc in Windows system files automatically by a simple drag-n-drop function. It shows buttons for almost all system files which need to be modified by a skin pack to customize Windows UI. When you click on the button, it opens a folder which contains the resources of that file. Replace the resource with your desired one and click on "Create Setup" button.


You can also set your theme, wallpaper, cursor, sound scheme, etc with the help of this awesome software.

Click on the "Help" button and check the images to get more details about using this tool.

It also contains useful tool like Resource Hacker, Resource Extractor, Renamer, Convert PNG to BMP, etc to make your task easier.

Really an excellent and useful tool for people who want to create their own transformation or customization pack.

You can download it using following link:


Download Skin Pack Installer System (32-bit)


Download Skin Pack Installer System (64-bit)


8 Skin Pack 2.0 For XP


Transform XP to 8
Support:
- Windows XP (Home, Pro, RTM, SP1, SP2, SP3, Corporate)
- Windows 2003 (Standard, Enterprise, Datacenter, Web, RTM, SP1, SP2)
- Windows Media Center Edition (2003, 2004, 2005)
- Windows XP Tablet PC Edition
- All Language Versions
Note : Before install close all runnig program , after finish restart your system .
Skin Packs installer have easy and safe install option , its better to unistall old or other version of skin packs.

Programs:
Note : Some Program Need to install .Net FrameWork 4.0 For Runnig


8 Skin Pack X64 V4.0 Win 7


Transform 7 to 8
Support:
Windows 7 , Windows 7 SP1 , Windows Server 2008 R2 , Windows Server 2008 R2 SP1 - [X64 (64Bit)] - [All Language]

Note : Before install disable user account controller and close all runnig program , after finish restart your system , in windows server make sure theme service is runing .
Skin Packs installer have easy and safe install option , its better to unistall old or other version of skin packs.

Programs:
Note : Some Program Need to install .Net FrameWork 4.0 For Runnig


7 Skin Pack 6.0 For XP

Transform XP to 7
Support:
- Windows XP (Home, Pro, RTM, SP1, SP2, SP3, Corporate)
- Windows 2003 (Standard, Enterprise, Datacenter, Web, RTM, SP1, SP2)
- Windows Media Center Edition (2003, 2004, 2005)
- Windows XP Tablet PC Edition
- All Language Versions
Note : Before install close all runnig program , after finish restart your system .
Skin Packs installer have easy and safe install option , its better to unistall old or other version of skin packs.

Programs:
Note : Some Program Need to install .Net FrameWork 4.0 For Runnig


Ubuntu Skin Pack 4.0 For XP


Transform XP to Ubuntu
Support:
- Windows XP (Home, Pro, RTM, SP1, SP2, SP3, Corporate)
- Windows 2003 (Standard, Enterprise, Datacenter, Web, RTM, SP1, SP2)
- Windows Media Center Edition (2003, 2004, 2005)
- Windows XP Tablet PC Edition
- All Language Versions
Note : Before install close all runnig program , after finish restart your system .
Skin Packs installer have easy and safe install option , its better to unistall old or other version of skin packs.

Programs:
Note : Some Program Need to install .Net FrameWork 4.0 For Runnig


HDD Regenerator 2011

Written By Unknown on Sunday 24 July 2011 | 08:30


HDD Regenerator – the unique program to restore the hard drive. The program eliminates physical damages (bad sectors) with the disk surface. She does not hide bad sectors, it really restores them! Almost 60% of damaged hard drives have incorrectly magnetized surface. Our researchers have worked successfully and have found a special algorithm for sequences of signals of low and high level. These signals are generated by the program and change the damaged area. Even low-level format can not cope with this task!

HDD Regenerator is a unique program for regeneration of physically damaged hard disk drives. It does not hide bad sectors, it really restores them! Hard disk drive is an integral part of every computer. It stores all your information. One of the most prevalent defects of hard drives is bad sectors on the disk surface. Bad sectors are a part of the disk surface which contains not readable, but frequently necessary information. As a result of bad sectors you may have difficulties to read and copy data from your disk, your operating system becomes unstable and finally your computer may unable to boot altogether. When a hard drive is damaged with bad sectors, the disk not only becomes unfit for use, but also you risk losing information stored on it. The HDD Regenerator can repair damaged hard disks without affecting or changing existing data. As a result, previously unreadable and inaccessible information is restored.

How it works

Almost 60% of all hard drives damaged with bad sectors have an incorrectly magnetized disk surface. We have developed an algorithm which is used to repair damaged disk surfaces. This technology is hardware independent, it supports many types of hard drives and repairs damage that even low-level disk formatting cannot repair. As a result, previously unreadable information will be restored. Because of the way the repair is made, the existing information on the disk drive will not be affected!

Can the HDD Regenerator repair your drive?

Almost 60% of damaged hard disks can be repaired by regeneration. You can always download free demo version and try to regenerate the first found bad sector. The main purpose of the unregistered demo version is to display a report which contains information about the possibility to regenerate the entire disk by means of the registered full version. If the first found bad sector has been successfully regenerated, you can buy the product to regenerate all bad sectors on your hard drive. If the first bad sector has NOT been successfully regenerated, then replace your hard disk drive as soon as possible.

Important notes

Since the program does not change the logical structure of a hard drive, the file system may still show some sectors marked earlier as \̢۪bad\̢۪, and other disk utilities such as Scandisk will detect logical bad sectors even though the disk has been successfully regenerated and is no longer damaged by physical bad sectors. If you want to remove these marks, repartition the hard disk drive..

Program features

• Ability to detect physical bad sectors on a hard disk drive surface.

• Ability to repair physical bad sectors (magnetic errors) on a hard disk surface.

• The product ignores file system, scans disk at physical level. It can be used with FAT, NTFS or any other file system, and also with unformatted or unpartitioned disks.

• Starting process directly under Windows XP / Vista.

• Bootable regenerating flash can be created from the program and used to automatically start regenerating process.

• Bootable regenerating CD allows starting regenerating process under DOS automatically.


HDD Regenerator regenerates bad sectors reversal. Almost 60% of hard drive beyond repair program. As a result, corrupted and unreadable information is restored without any impact on existing data.

Since the program works only on a physical level, type of operating system irrelevant. The logical structure of the hard disk is not changed and the file system can contain the sectors marked as bad, even if the hard disk has been restored and contains no injuries. To remove these marks repartition your disk, or take advantage of PowerQuest PartitionMagic (function of Bad Sectors Retest).

HDD Regenerator 2011

· Prescan mode (very useful for fast determination of bad sectors location, if a hard drive has a large number of bad sectors. Saves your time. Bad hard drives are scanned in this mode even faster than good drives!)

· Normal scan mode has faster scanning speed

· 4K sector size support

· Automatic process resume in any mode (except CD / DVD)

· Multiple hard drives better support

· Real-time hard drive state monitor (will be available soon, currently limited)

· Other enhancements (including temperature indicator, convenient range of sectors selection, bad SMART status. Indication, overheating indication, etc.)

Download Internet Download Manager 6.05 Full Version


New! Internet Download Manager v6.05. Fixed compatibility problems with different browsers including Internet Explorer 9 Final, Mozilla Firefox 4,

Mozilla Firefox 5 and Mozilla Firefox 6, Google Chrome. Improved FLV grabber to save videos from web players on YouTube, Google Video


Internet Download Manager 

(IDM) is a tool to increase download speeds by up to 5 times, resume and schedule downloads. Comprehensive error recovery and resume capability will restart broken or interrupted downloads due to lost connections, network problems, computer shutdowns, or unexpected power outages. Simple graphic user interface makes IDM user friendly and easy to use.Internet Download Manager has a smart download logic accelerator that features intelligent dynamic file segmentation and safe multipart downloading technology to accelerate your downloads. Unlike other download managers and accelerators Internet Download Manager segments downloaded files dynamically during download process and reuses available connections without additional connect and login stages to achieve best acceleration performance.

Internet Download Manager supports proxy servers, ftp and http protocols, firewalls, redirects, cookies, authorization, MP3 audio and MPEG video content processing. IDM integrates seamlessly into Microsoft Internet Explorer, Netscape, MSN Explorer, AOL, Opera, Mozilla, Mozilla Firefox, Mozilla Firebird, Avant Browser, MyIE2, and all other popular browsers to automatically handle your downloads. You can also drag and drop files, or use Internet Download Manager from command line. Internet Download Manager can dial your modem at the set time, download the files you want, then hang up or even shut down your computer when it's done.

Other features include multilingual support, zip preview, download categories, scheduler pro, sounds on different events, HTTPS support, queue processor, html help and tutorial, enhanced virus protection on download completion, progressive downloading with quotas (useful for connections that use some kind of fair access policy or FAP like Direcway, Direct PC, Hughes, etc.), built-in download accelerator, and many others.
Version 6.05 adds IDM download panel for web-players that can be used to download flash videos from sites like YouTube, MySpaceTV, and Google Videos. It also features complete Windows 7 and Vista support, YouTube grabber, redeveloped scheduler, and MMS protocol support. The new version also adds improved integration for IE and IE based browsers, redesigned and enhanced download engine, the unique advanced integration into all latest browsers, improved toolbar, and a wealth of other improvements and new features.


IDM is really user friendly and easy to use according my opinion. Okey, I will share to you IDM 6.05 Build 7 Full version. You can downloadInternet Download Manager 6.05 Build 7 Final + Crack via the link below.


 Download link 

 >>Download<<


Missing operating system: Windows 7

Written By Unknown on Tuesday 19 July 2011 | 11:05

Run chkdsk to repair disk errors

First of all, don’t panic! If you panic and do things without thinking about consequences, you might damage your system and lose data. The solution to this problem is usually very simple. Your hard drive might have disk errors, therefore you are not able to start your system. This often happens when you restart your PC during a boot-up secquence while it’s loading safe-mode for example.

1. Find your Windows 7 DVD.
2. Start your PC, insert your Windows 7 DVD and hit a key when you are asked to (to boot from DVD). It is possible that you have to change the boot order in your BIOS to boot from DVD.
3. Follow the instructions on the screen, but don’t install Windows 7, instead click on “Repair your computer“:


he installer will now search for Windows installations on your PC and list them all. Select your Windows 7 installation and click on next.


4. Open the command prompt.


Attention: Do NOT click on “System Restore” or “System Image Recovery”. If you try to restore/recover your system that way, you might damage your Windows 7 installation irreversibly.

5.You will probably be in a folder X:\sources\ . Don’t worry, if your partitions are still there you can run a chkdsk on them.


Run a chkdsk for your main partition (e.g. C:), to do that enter:
chkdsk c: /f/r

/f /r will both fix errors and recover lost data.

/f will only fix errors on your disk

/r will only recover lost data
This will, in most cases, repair your disk errors and you will be able to start Windows 7 again.

Windows 7 Bootrec.exe – Repair MBR

While you’re at it, you also might want to repair and fix your MBR (Master Boot Record), add a new boot sector and scan your disk for Windows 7 installations.

/fixmbr

This will create a new Master Boot Record, but will not overwrite your exisiting partition table.

/fixboot

This will add a new boot sector. If you boot sector is damaged you might not be able to start your system.

/rebuildbcd

Scans your disk for Windows-7 compatible installations, needed to repair your Windows 7 installation.

How to replace Explorer.exe in Windows 7?

Do you want to replace the Explorer.exe? Some Windows 7 themes that you can download on this site will come with a file “explorer.exe”. This is a very important system file, so please be careful, make a backup and follow the instructions closely when you learn how to replace the explorer.exe.


The easiest and shortest way to replace the explorer.exe and any other system files is to download a registry hack that will add the option Take Ownership to your right-click context menu.
Download this script:>>Download<<


and double-click on the .reg (registry) file to add an option “Take Ownership” to your contextual menu (the right-click menu).
You can then right-click on your system files and take ownership of them. After that, you can rename all files and replace the system file / explorer.exe easily.

There are three methods, one for the beginners and the other for advanced users, click on the links below to start:
  • Method 1 (Beginner via Registry)
  • Method 2 (Beginner via GUI)
  • Method 3 (Advanced via Command Prompt)


Method 1: Change registry path to explorer.exe

The easiest method to replace explorer.exe is to open the registry and then change the path to the explorer.exe.

If you still need the system icons: Volume, Network Connections, Battery and Action Center, then don’t use Method1 because changing the registry path to explorer2.exe will disable them.

0. Make sure to know the difference between a 64-bit explorer.exe and a 32-bit explorer.exe. You can’t use a 64-bit explorer.exe on a 32-bit system.

1. Rename your new explorer.exe to explorer2.exe and copy it into the Windows directory: C:\Windows\
2. Open the registry: Click on “Start” and enter regedit into the search field:
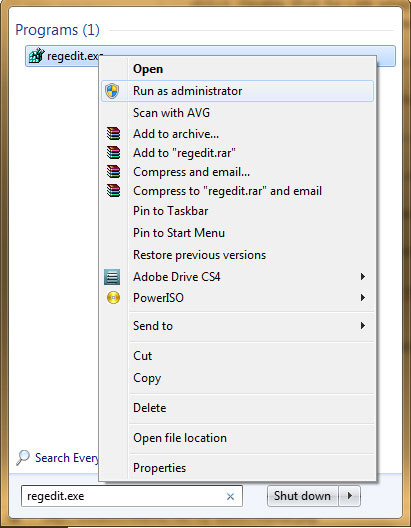

                                                                                                   
3. Right-click on regedit at the top and select “Run as administrator”
4. Uncollapse the following path: HKEY_LOCAL_MACHINE>Software>Microsoft>Windows NT>CurrentVersion>Winlogon
5. Change explorer.exe to explorer2.exe.
6. End the process explorer.exe via the task manager and start a new process by entering “explorer2.exe”.
If 6. is too complicated for you: Reboot or read below for more instructions how to end the process explorer.exe.

Method 2: Take Ownership + Edit Permissions via Interface

Assign Ownership of Explorer.exe

1. Right-click on explorer.exe and click on “Properties“. Go to the tab “Security“, click on “Advanced“:


2. Go to the tab “Owner” and click on “Edit“:


3. Assign the ownership to your administrator account by selecting your “Administrator account” (usually  Administrators(username\Administrators)) and click on “Apply


The current owner should now be your administrator account. Confirm that!

Change Permissions of Explorer.exe

4. Click on “OK” and you will be back at the security tab of explorer.exe. There click on “Edit”:


5. Select your administrator account (usually Administrators(username\Administrators ) and check the option “Full Control“. Click on “Apply“:


6. Now you can rename your explorer.exe to explorer.exe_old and copy your new explorer.exe into the Windows folder.
Restart your PC or restart explorer.exe (instructions below).

Method 3: Take Ownership via Command Prompt

Copy your new explorer.exe to C:\

Take Ownership of new Explorer.exe

Next, we take control of it!
You can either download this script: (it will add the option “take ownership to your context menu) or you can do it manually.
I usually do it manually:
Enter cmd.exe into the search field on the Start menu and right-click on cmd.exe, click on “Run as administrator”.
  • Enter cd C:\Windows\
  • Enter TAKEOWN /F explorer.exe

Terminate Explorer.exe

Open up the task manager (CTRL+ALT+DEL) and right-click on Explorer.exe and terminate it:


New Task (Run…)

Don’t be shocked, your taskbar will disappear. You can always make it reappear again by launching a new task and entering “explorer.exe”.


Now click on “New Task” and enter:
  • runas /u:Administrator cmd.exe (this will launch cmd.exe as administrator)
You will be prompted for your password, enter it

Take Ownership of old Explorer.exe

5. Take ownership of the real explorer.exe and grant permission to administrators to modify it :
  • cd C:\Windows\
  • TAKEOWN /F explorer.exe
  • ICACLS explorer.exe /grant administrators:F

Final Step: Rename and move Explorer.exe

Rename the explorer.exe and paste the new explorer.exe into the Windows folder:
  • Enter rename explorer.exe explorer.exe_old
  • Enter move C:\explorer.exe C:\windows\
Back in the taskmanager click on “New Task” and enter “explorer.exe”. Voilà, you just replaced your explorer.exe!

Explorer.exe: Class not registered

If you receive the error “Class not registered”, you might want to try this:


Start > Run > regsvr32 ExplorerFrame.dll

Make sure that ExplorerFrame.dll is a valid DLL


If you receive the error “The module ExplorerFrame.dll was loaded but the entry-point DllRegisterServer was not found. Make sure that ExplorerFrame.dll is a valid DLL or OCX file and then try again”, you are probably trying to launch a 32-bit explorer.exe on a 64-bit system.
Are you running a 64-bit system? Then make sure that your new explorer.exe is a 64-bit file or it won’t work!


“Bootmgr is missing” in Windows 7

The dreaded message “bootmgr is missing” still exists today, but luckily there are some easy solutions.


First of all, don’t panic. If your bootmgr file is missing that doesn’t necessarily mean that you lost any data, it simply means that your boot manager is missing, nothing more.
To repair your boot records, you have to launch the start-up option “repair your computer”. On boot-up press F8 to get to startup options. Click on “Repair your computer”:


You’ll get a list of operating systems installed on your PC:


Method 1: Repair bootmgr via Command Prompt

Open the command prompt.


Next, simply enter the following command to fix your boot record:
/fixboot
In case your master boot record has been damaged as well, I would also run
/fixmbr


Method 2: Repair bootmgr via “Startup Repair”

Theoretically, Windows 7 should be able to find and fix this error. If you click on “Startup Repair” instead of Command Prompt, then Windows will scan your system for common errors and will hopefully figure out that your bootmgr is broken.


Check disk for errors

Another error why you are receiving the “bootmgr is missing” error after installing Windows 7, might be that your hard drive has disk errors. It is always a good idea to also run the command
chkdsk C:\ /f /r
This might take some time, depending on the size of your hard drive, but it is necessary to verify that there are no corrupted files on your disk.

Hacking the Logon Screen using Resource Hacker

Written By Unknown on Monday 18 July 2011 | 08:08

This trick is very easy to do but it needs Resource Hacker and If you don't already have Resource Hacker go download it now . I have tried this on Windows XP..

Steps


  • Browse to C:\windows\system32 and copy logonui.exe and paste it to C:\ Now, open C:\logonui.exe with Resource hacker.
  •  
  • Click on Action and then on Replace bitmap. If you are good with graphics you can make your own logon screen, you should be able to scroll thru the bitmaps in this file and figure out what's where. If your not great with graphics :/ like myself, you can download already made graphics and use them, or use them as a template.
  •  
  • To set the size of Bitmap 100: Go into the \UIFILE\1000\1022\ tree and press CTRL+F Now, find Change the entire line to read: Where xxx is put the width e.g. 400rp (the rp @ the end is needed) and where yyy is, put the height e.g. 1000rp. Make sure the image doesn't go over the login names because it slows down to a snails pace (fading etc.)
  • Once you have everything the way you want it, just save the file to C:\ and close Resource hacker. Now, copy the modified logonui.exe to C:\windows\system32 and replace it with original one. 
  •  
  • Reboot to see Ur logon screen


One-click PC shut down

This is really very easy one but very effective one. Enjoy it!

First, create a shortcut on your desktop by right-clicking on the desktop, choosing New, and then choosing Shortcut. The Create Shortcut Wizard appears. In the box asking for the location of the shortcut, type shutdown. After you create the shortcut, double-clicking on it will shut down your PC.

But you can do much more with a shutdown shortcut than merely shut down your PC. You can add any combination of several switches to do extra duty, like this:


shutdown -r -t 01 -c “Rebooting your PC”

Double-clicking on that shortcut will reboot your PC after a one-second delay and display the message “Rebooting your PC.” The shutdown command includes a variety of switches you can use to customize it. Table 1-3 lists all of them and describes their use.

I use this technique to create two shutdown shortcuts on my desktop—one for turning off my PC, and one for rebooting. Here are the ones I use:

shutdown -s -t 03 -c “Bye Bye m8!”
shutdown -r -t 03 -c “I ll be back m8 !”

Switch
What it does

-s
Shuts down the PC.

-l
Logs off the current user.

-t nn
Indicates the duration of delay, in seconds, before performing the action.

-c “messagetext”
Displays a message in the System Shutdown window. A maximum of 127 characters can be used. The message must be enclosed in quotation marks.

-f
Forces any running applications to shut down.

-r
Reboots the PC.


Web Browsers

Mobiles

Hacking Tricks and Tips

 
Support : Creating Website | Aman Kamboj | Dewnext
Template Modify by Creating Website